
FAQ About LoveTrackers

Introduction to LoveTracker
LoveTracker helps you stay connected with the people who matter most — privately and securely.
You only share your location when you choose to — whether you're meeting up with friends, letting loved ones know where you are, or simply checking in.
Key Features:
1. Live Location Sharing
Share your real‑time location with friends or family whenever you need to — and stop anytime by closing the app or turning off location access.
2. Privacy & Control
You're always in control. Share only when you want — not a second longer. No constant tracking, no pressure.
3. History Route View
Review your own past routes, as well as your friends’ shared location history. Whether you're revisiting travel routes or confirming visited places, everything is clear and easy to access.
LoveTracker keeps it simple: share your location only when you want, and only with the people you trust.
How to Start Sharing Locations?
LoveTracker is a consent-based location sharing app designed for families and trusted circles. You can only see someone's location after they accept your invitation and agree to share.
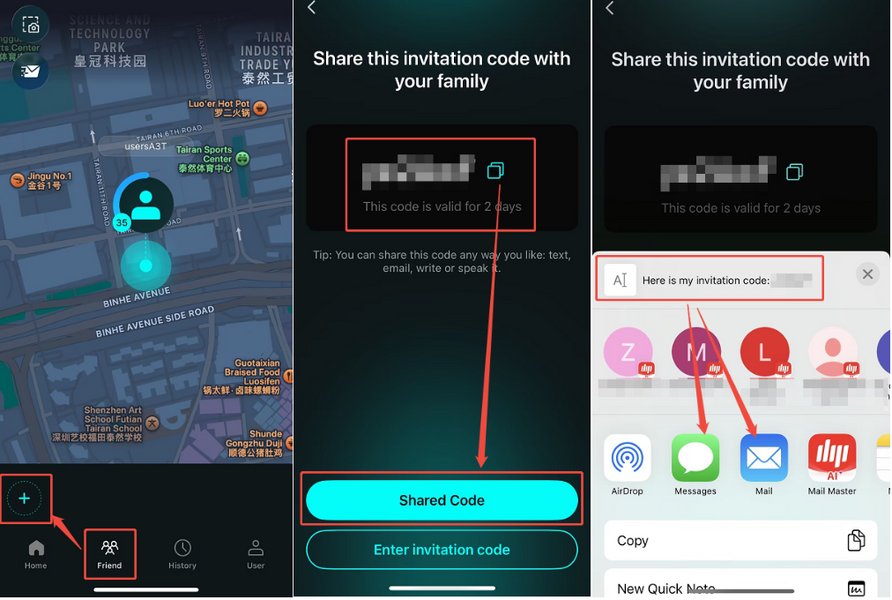
Step 1: Invite a friend or family member
1. Open LoveTracker and allow location access.
2. Tap the Friend icon (second from the left at the bottom).
3. Tap the "+" button in the bottom‑left corner.
4. Copy the invitation code and share it with your friend.
(You can share it any way you like — via text, email, or even tell them directly.)
Step 2: Your friend accepts the invitation
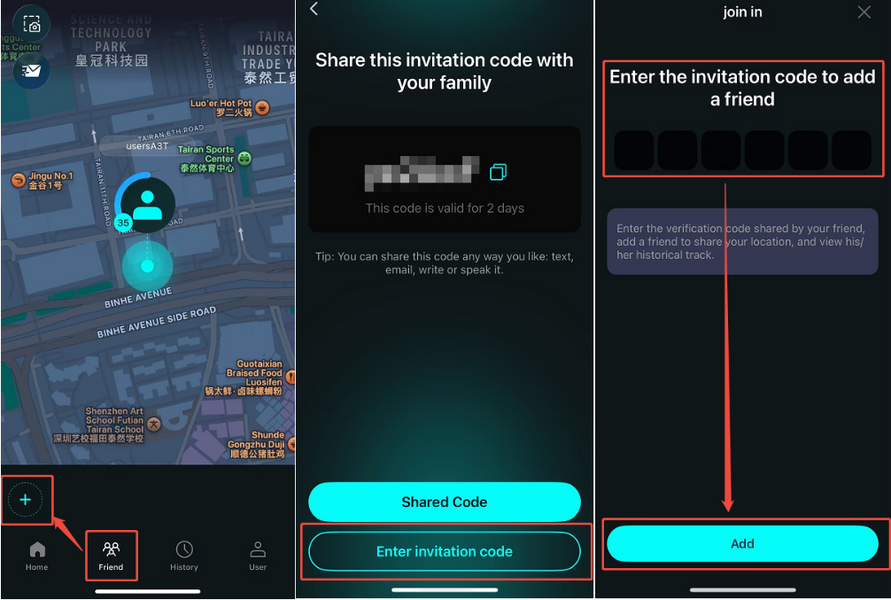
1. Your friend opens LoveTracker and allows location access.
2. They tap the Friend icon, then the "+" button.
3. They enter the invitation code you sent.
✅ That's it. Once both sides complete these steps, you'll see each other's live locations on the map.
⚠️ Important to Know
● Location updates only happen when the app is open and sharing is enabled.
No updates occur when the app is closed or location permission is turned off.
If your friend's location still isn't showing after they enter the invitation code, the most common reason is that they haven't granted LoveTracker permission to access their location on their device.
How to fix it:
Ask your friend to go to their device Settings (the system settings on their phone, not the app settings):
Settings → Apps → LoveTracker → Permissions → Location → Allow
Once location access is re‑enabled, their location should appear.
💡 Need More Help?
If you're still having trouble, feel free to reach out to us at [email protected] — we're happy to guide you through it.
Our working hours:
Mon – Fri, 9:30 AM – 6:30 PM (UTC+8)
We'll get back to you as soon as possible during business hours.
How to View History Routes?
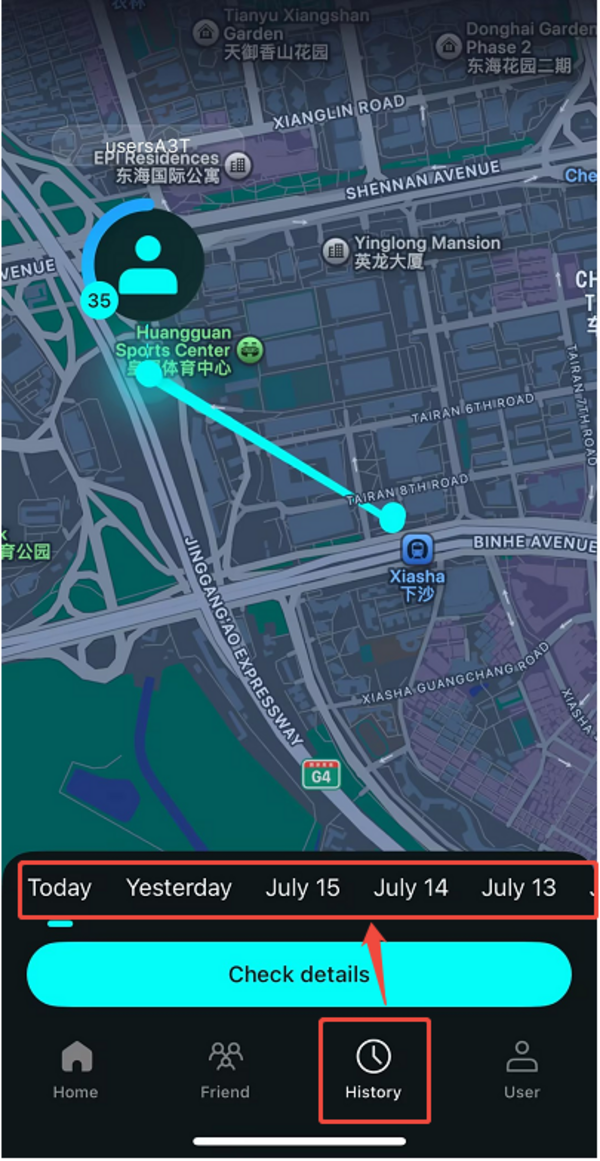
You can review your own location history, as well as the locations your friends shared with you during the time they had sharing enabled.
Steps:
1. Tap the History icon (third from the left at the bottom of the screen).
2. Swipe or scroll to select the date you want to view.
3. Tap "Check Details" to see the location information for that day.
💡 Need More Help?
If you're still having trouble, feel free to reach out to us at [email protected] — we're happy to guide you through it.
Our working hours:
Mon – Fri, 9:30 AM – 6:30 PM (UTC+8)
We'll get back to you as soon as possible during business hours.
How to Set Up or Change Your Account Information?
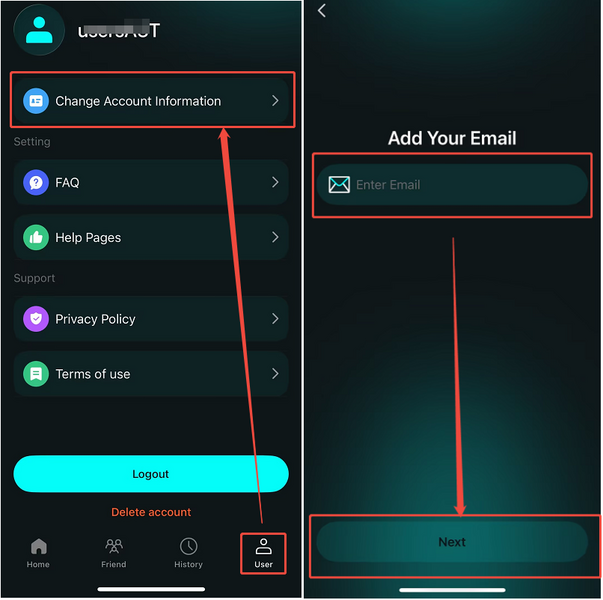
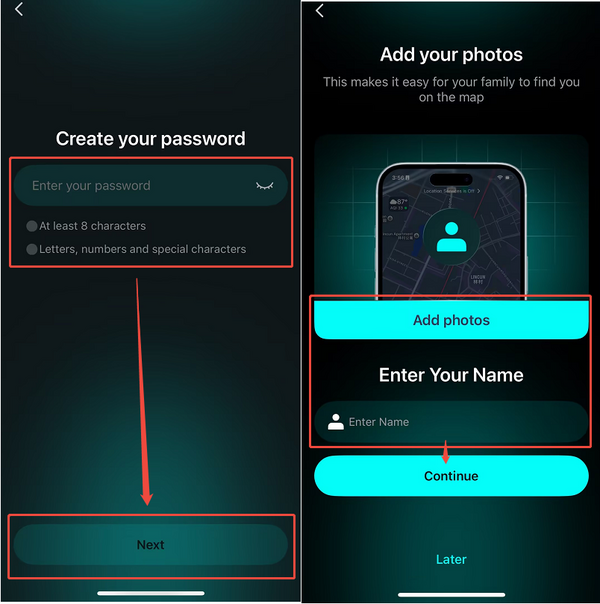
You can update your account details — such as your login email, password, profile photo, and display name — at any time.
Steps:
1. Tap the "User" icon (the last icon at the bottom of the screen).
2. Select "Change Your Account Information".
3. Set your login email and password
Enter your email address and choose a password. This will be the email you use to log in to LoveTracker.
4. Add your profile photo and display name
Upload a photo as your avatar and enter the name you'd like your friends to see on the map.
5. Tap "Continue" to save your changes.
💡 Need More Help?
If you're still having trouble, feel free to reach out to us at [email protected] — we're happy to guide you through it.
Our working hours:
Mon – Fri, 9:30 AM – 6:30 PM (UTC+8)
We'll get back to you as soon as possible during business hours.
How to Delete Your Account?
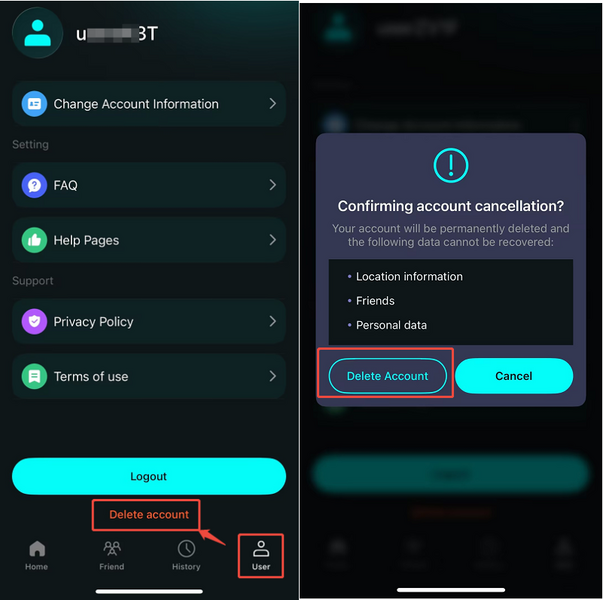
If you no longer wish to use LoveTracker, you can delete your account directly from the app.
Steps:
1. Tap the "User" icon (the last icon at the bottom of the screen).
2. Scroll down and tap "Delete Account".
3. Confirm your choice when prompted.
⚠️ Please note: Deleting your account is permanent. All your data, including location history and friend connections, will be removed and cannot be recovered.
💡 Need More Help?
If you're still having trouble, feel free to reach out to us at [email protected] — we're happy to guide you through it.
Our working hours:
Mon – Fri, 9:30 AM – 6:30 PM (UTC+8)
We'll get back to you as soon as possible during business hours.
Widget Functions Guide
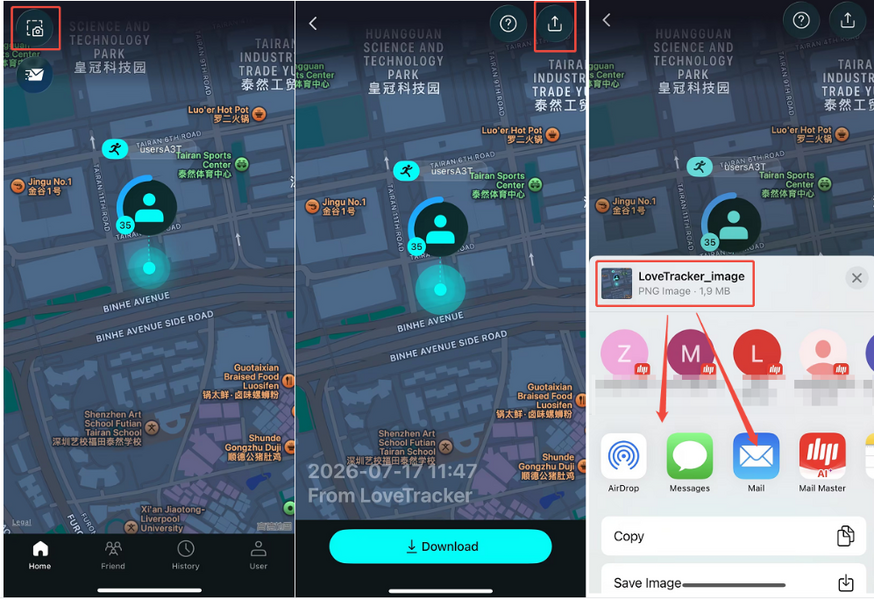
Location: First icon in the top‑left corner.
Tap this icon to take a screenshot of your current location‑sharing page. The image will show the approximate locations of both you and your friend(s).
After taking the screenshot, you can:
● Tap Download to save it to your device.
● Tap the Share icon in the top‑right corner to send the screenshot to a friend.
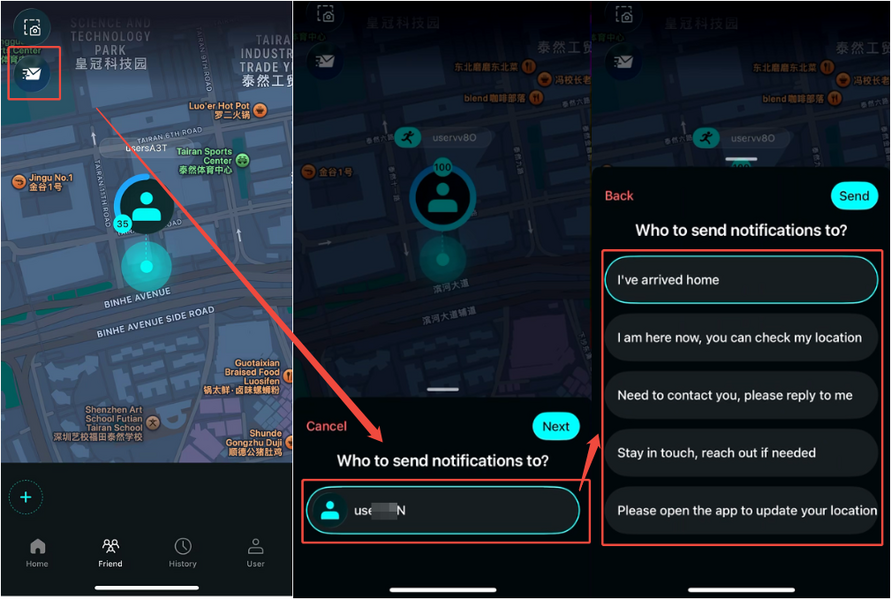
Location: Second icon in the top‑left corner.
Use this feature to send a pre‑set status message to your friend, letting them know your current situation without typing.
How to use it:
1. Tap the Quick Status icon (second from the left at the top).
2. Select the friend you want to notify.
(If your friend list is empty, please send an invitation code first. See "How to Start Sharing Locations?" for details.)
3. Choose one of the status messages to send
Once selected, the message will be sent immediately to your friend.
💡 Need More Help?
If you're still having trouble, feel free to reach out to us at [email protected] — we're happy to guide you through it.
Our working hours:
Mon – Fri, 9:30 AM – 6:30 PM (UTC+8)
We'll get back to you as soon as possible during business hours.
How to Cancel Your Subscription?
To cancel your subscription, please follow these steps:
1. Open the cancellation page: Cancel Subscription.
2. Enter your payment email and request a verification code.
3. Enter the code and click "Cancel Subscription".
If your email isn't recognized, contact us at [email protected] with your account email and receipt — we'll cancel it for you.
Our working hours:
Mon – Fri, 9:30 AM – 6:30 PM (UTC+8)
We'll get back to you as soon as possible during business hours.
How to Request a Refund?
We process refund requests within 24 business hours under the following conditions:
- 30% refund – if the payment was completed within the last 30 days
- No refund – if the payment was completed more than 30 days ago
⚠️ Refunds are not available for trial periods or for services that have already been used.
How to submit a refund request:
- Email us at [email protected] with the required details
Please include the following when submitting your request:
1. Your LoveTracker account email (the email address used to bind to LoveTracker)
2. A copy of your receipt showing:
- Merchant name
- Order number
- Payment date
- Amount
3. The last four digits of the card used for payment
4. The reason for your refund request (your feedback helps us improve)
What happens next?
Once we verify the information, we will process your refund promptly. You will receive a confirmation email once the refund is completed.
Our service hours:
Mon – Fri, 9:00 AM – 6:30 PM (UTC+8)
